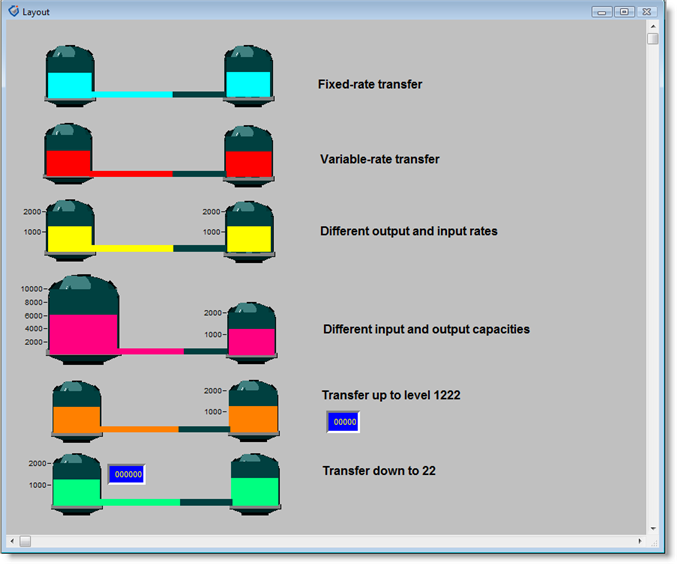
The following examples show how to model different tank and flow situations. For full models illustrating these situations, see the reference model in the MODELS\REFS directory within the
A typical tank modeling situation is the arrival of an entity (e.g., a tanker or other vehicle) to deliver its contents to a tank. To model this situation, define an arrival or routing for the entity, causing it to enter the location where it will make its delivery. In the entity processing logic at the delivery location, call the Tank_Fill subroutine. By calling rather than activating the subroutine, you will detain the delivering entity until Tank_Fill executes. Note that the material does NOT route from the delivery location to the tank. Instead, the Tank_Fill subroutine simply fills the tank with a specified quantity while the entity waits. Unless the quantity is a constant amount, it is usually a good idea to use an entity attribute to store this quantity value. After filling the contents into the tank, the entity is free to continue processing.
To illustrate how an entity might transfer its contents to a tank, suppose an entity, Tanker, arrives at a location, Delivery, carrying a quantity of gallons stored in an entity attribute called Tanker_Qty. The tanker discharges its contents into a tank, ReceivingTank, at a rate of 200 gallons per minute. Once the ReceivingTank becomes full, the level must drop to 1000 gallons before filling resumes. Since the entity is tied up while it discharges into the tank, use the following statement in the processing logic for Tanker at Delivery to define the logic used to fill the tank:
Tank_Fill (ReceivingTank, Tanker_Qty, 200, 1000)
The above statement causes each arriving tanker to wait until the quantity stored in its Tanker_Qty attribute adds to the ReceivingTank. Once the tanker delivers this quantity, it is free to execute the routing defined for it at the Delivery location.
A supply tank is an originating tank that is a source of raw material for one or more downstream tanks. Often, supply tanks contain ingredients that feed into a mixing tank or hold chemicals that feed into a reactor. Typically, you replenish a supply tank when it gets low and make it available for use whenever it has an adequate supply. If you always stock the supply tank and it is always available for use, you do NOT need to model it since it poses no constraint on the process. You may set supply tanks to an initial level at the start of the simulation in the initialization logic, then use them as needed by a mixing or other downstream tank. To initialize the level in a supply tank, enter the following statement in the initialization logic:
Tank_SetLevel (<supply tank>, <qty>)
If, for example, you wanted to begin the simulation with the supply tank, WaterTank, filled with 800 gallons of water, you would enter:
Tank_SetLevel (WaterTank, 800)
To gradually fill or refill a supply tank whenever it drops below a trigger level, use the Tank_Fill subroutine with a large fill quantity and an appropriate resume level. For example, the following statement will continue pumping up to 999999 units into TankA at a rate of 200 units per minute. Whenever the tank becomes full, it must drop to 400 units before filling resumes.
Tank_Fill (TankA, 999999, 200, 400)
Mixing and reactor tanks receive material usually from one or more supply tanks. Once it receives the material, the tank may require a mixing or other reaction time. To illustrate, suppose we have two tanks (Tank1 and Tank2) supplying ingredients to a tank called MixingTank. First, workers pump 2000 gallons of a liquid from Tank1 at 50 gallons per minute followed by the transfer of 300 pounds of dry mix from Tank2 at 20 pounds a minute (the dry mix adds .2 gallons to the level of the MixingTank for every pound transferred, equating to 4 gallons per minute). The ingredients then mix for 15 minutes before transferring to an idle storage tank. After transferring the mix, workers must clean the MixingTank for 50 minutes to prepare it for the next mixing cycle.
The control logic for the mixing tank should be a subroutine activated from the initialization logic which continues to loop throughout the simulation. The subroutine logic might appear as follows:
Tank_Loop //logic repeats continuously
{
Tank_Transfer (Tank1,MixingTank,2000, 50, 0, 0)
Tank_Transfer (Tank2,MixingTank, 300, 20, 4, 0)
Tank_DoOperation (MixingTank,15) //Mix time
Wait Until Tank_State [StorageTank]= Tank_Idle /* Waits for storage tank availability */
Tank_Transfer (MixingTank, StorageTank, Tank_Level[MixingTank],40, 0, 0)
Tank_Prep (MixingTank, 50) // Clean mixing tank for 50 minutes.
}
If the ingredients feed into the mixing tank at the same time rather than sequentially, activate the Tank_Transfer subroutines for the mixing tank and monitor the Tank_Fills array to know which ingredients enter into the tank. For simultaneous fills, replace the first two transfer statements following the BEGIN statement in the previous subroutine with the following logic:
Tank_Fills[MixingTank]=0
ACTIVATE Tank_Transfer(Tank1, MixingTank, 2000, 50, 0, 0)
ACTIVATE Tank_Transfer(Tank2, MixingTank, 300, 20, 4, 0)
WAIT UNTIL Tank_Fills[MixingTank]=2
...
Often, tanks deliver material to discrete entities such as containers (or perhaps the material itself converts to discrete entities through a solidification or consolidation process). In either case, you can draw from the delivery tank using the Tank_Empty subroutine if outflow is gradual and defined by a flow rate, or the Tank_Dec subroutine if the output occurs in discrete intervals based on a bottling or packaging time.
To output material from a tank without modeling the entity to which it outputs, call the Tank_Empty or Tank_Dec subroutine. To transfer material from a tank to entities arriving at a filling station (remember, the filling station itself is NOT a tank), route the entities to the filling station using a SEND or other routing rule, then call the Tank_Empty or Tank_Dec subroutine.
If using the Tank_Dec subroutine, the entity should wait for the fill time before decreasing the tank level since Tank_Dec happens instantly. For example, if a bottling operation fills a 2 gallon container every 6 seconds, define the following processing logic for the container at the fill station:
Wait 6 sec
Tank_Dec (Filler, 2)
If the delivery tank has insufficient contents to decrease the level by the specified amount, the processing will automatically pause until enough material is available. Once the specified quantity empties, the entity can continue processing. To create an entity as the result of an emptying operation, define an activated subroutine that empties the desired quantity, then execute an ORDER statement. This will create a new entity at the filling station.
When transferring from one tank to another, you must determine whether the source tank makes the decision to transfer to the destination tank (a push approach) or whether the destination tank makes the decision to draw material from a source tank (a pull approach). You should define a control subroutine from the perspective of the tank that makes the decision. If the model requires no tank selection, specify a WAIT UNTIL statement to wait until the FROM or TO tank satisfies the condition required for transfer. For example, if a source tank makes the decision to transfer to a destination tank whenever the destination tank becomes idle, enter the following statement in the subroutine:
Wait Until Tank_State [<destination tank ID>] = Tank_Idle
If the destination tank makes the decision to transfer (a pull approach), you should base the WAIT UNTIL statement on a required condition for the source tank as follows:
Wait Until Tank_State [<source tank ID>] = Tank_Blocked
Following the WAIT UNTIL statement, call the Tank_Transfer, Tank_TransferUpTo, or Tank_TransferDownTo subroutine to transfer from the source tank to the destination tank.
To illustrate how to define a tank transfer using a pull approach, suppose that TankB requires 1000 gallons from TankA whenever TankB becomes empty. TankB will draw material from TankA only when TankA has a minimum level of 1000 gallons. The subroutine to define this logic might appear as follows:
Tank_Loop //logic repeats continuously
{
Wait Until Tank_Level[TankA] >= 1000 /*Wait for TankA to reach 1000 gallons*/
Tank_Transfer (TankA, TankB, 1000, 200,0,0) /* Transfer 1000 gal to TankB at 200 gpm*/
[Enter TankB processing and emptying logic here]
}
Please Note: To select from among multiple input or output tanks, activate this subroutine in the initialization logic.
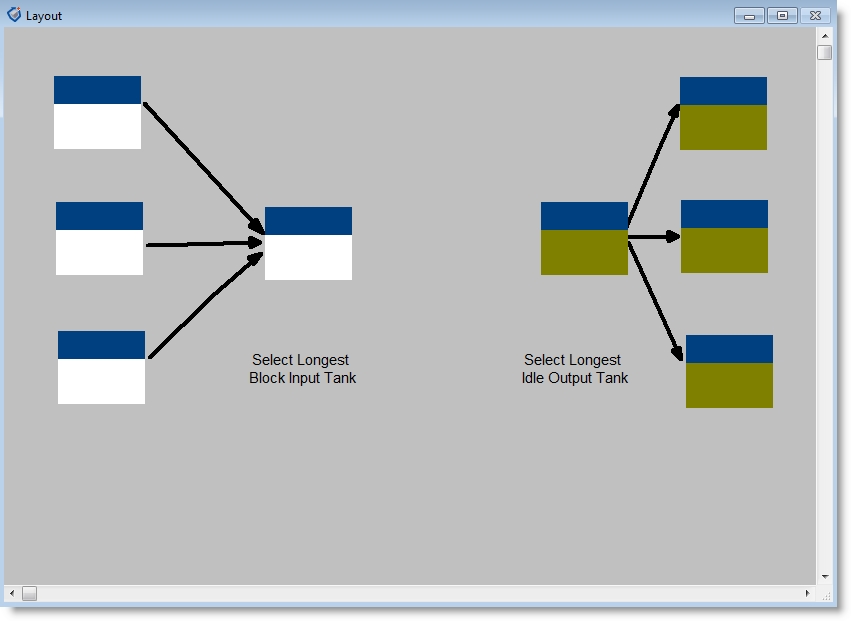
To enable one or more tanks to select from several input or output tanks, use the pre-defined subroutine Tank_SelectInput or Tank_SelectOutput (see subroutine descriptions).
For example, if TankX selects from among three input tanks (Tank1, Tank2, and Tank3) based on which input tank has waited the longest to discharge its contents, you would enter the following logic in the control subroutine defined for TankX:
INT Selected_Tank
SelectedTank = Tank_SelectInput(TankX, Tank1, 3,
Tank_LongestBlocked, 0)
The first statement defines a local variable, SelectedTank, used to assign which tank you select. The second statement calls the SelectInput subroutine specifying that TankX is to select one of three tanks beginning with Tank1. Tank_LongestBlocked causes TankX to select the tank blocked the longest (i.e., tank is full or waiting). Entering 0 at the end prevents selecting a full tank. If no tank is full, the statement does not execute until one of the input tanks fills. With a tank ID assigned to SelectedTank, you can call a transfer subroutine to make the transfer.
For output tanks, you would define similar logic but include Tank_SelectOutput instead of Tank_SelectInput.
Sometimes it is necessary to use a tank or separator to split the flow to several output tanks. To define the concurrent transfer of material from one tank to multiple tanks, define an activated subroutine for each transfer. Suppose, for example, that when TankA fills it begins transferring to TankB at a rate of 30 gpm and to TankC at a rate of 40 gpm. To know when both transfers are complete, define a global variable (e.g., TransferDone) which increments at the end of each transfer. Defining the following logic would initiate this split transfer once TankA is full:
ACTIVATE TransferToB () // initiates transfers from A to B
ACTIVATE TransferToC () // initiates transfers from A to C
WAIT UNTIL TransferDone = 2 // Wait until transfers are complete
TransferDone = 0 // reset for next transfer
The subroutines TransferToB and TransferToC would each execute a Tank_TransferDownTo command followed by a statement incrementing the value of TransferDone. For example, the logic for TransferToB would be as follows:
TransferDownTo(TankA, TankB, 0, 30, 0)
INC TransferDone
The transfer or empty rate can change dynamically during an empty, fill, or transfer. To vary the rate of flow, pass 0 as the flow rate when calling any of the transfer, fill, or empty subroutines. This calls the Tank_Rate subroutine automatically with each time step. You should modify the Tank_Rate subroutine so that it returns the appropriate rate value.
Suppose, for example, that TankA transfers to TankB at a rate that decreases from 150 gpm to 50 gpm when the level of TankB reaches 4000. To achieve this, pass 0 as the From Rate when you call the transfer subroutine, then enter the following logic in the Tank_Rate subroutine:
IF (Tank_FromID = TankA) AND (Tank_ToID = TankB) THEN
{
IF Tank_Level[TankB] >= 4000 THEN
RETURN 50
ELSE
RETURN 150
}
To momentarily interrupt flow into or out of a tank, use the Tank_GoDown subroutine or set the state of the tank to down (Tank_SetState = Tank_Down). This typically happens if a pump fails but may occur in other situations.
Normally, the flow into or out of a tank stops once you reach the desired quantity or level. However, in some situations you may wish to terminate a transfer if some event or condition occurs that you cannot predetermine (e.g., a decision to divert flow to a preferred outlet tank that just became available). In this case, you can turn off the flow into or out of a tank by specifying a variable transfer rate instead of a fixed transfer rate (see previous discussion, Varying the Transfer Rate). A variable transfer uses the Tank_Rate subroutine to determine the rate for each time step—to terminate a transfer, return a rate value of 0.
A trigger level is a level to which material in a tank either falls or rises and triggers some action. To continuously monitor when a tank reaches a trigger level, define and activate a trigger subroutine in the initialization logic. The subroutine should call Tank_RiseTrigger or Tank_FallTrigger depending on whether the associated action should execute when the tank level rises or falls to a certain level.
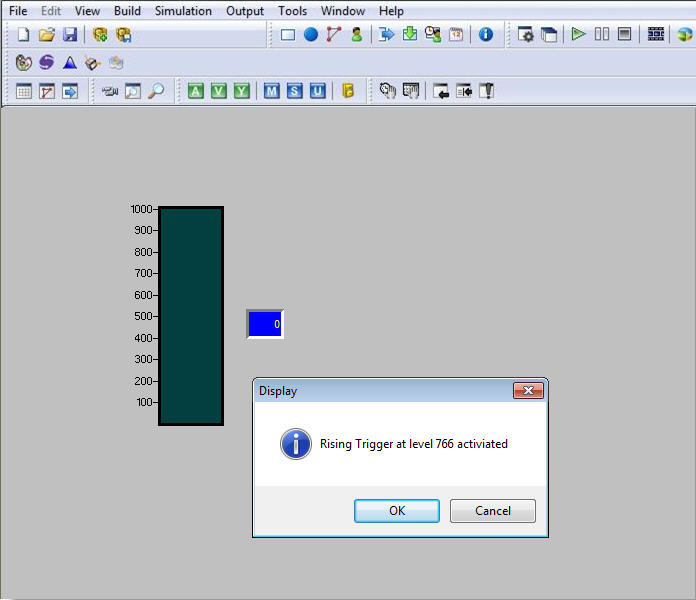
To show how to define a trigger subroutine, suppose that whenever TankA rises to 2000 gallons, an entity called Truck travels to a location called Pickup. The logic for this trigger subroutine might look as follows:
Tank_Loop //logic repeats continuously
{
Tank_RiseTrigger (TankA, 2000) /* waits for TankA to rise to 2000 units*/
Order 1 Truck to Pickup // order a Truck to Pickup
}
Once the tank reaches the trigger level, the Tank_RiseTrigger subroutine prevents further triggering until the level drops back below the trigger level first.
When you use trigger subroutines, use them sparingly because they are CPU intensive. Every time the tank level changes,
Where you must track several different products through one or more tanks, it may be useful to define macros for naming each product type. For example, setting ProductA equal to 1 and ProductB equal to 2 will improve the readability of the model. To track which product a particular tank is processing,
Tank_Product [Tank1] = ProductA
To show pipes connecting the tanks, use paths or background graphics. If you desire to show the material in the pipe, use a long, skinny tank with a capacity of 1 to represent the pipe. You can set the level of this tank to 0 or 1 to show product flow. For example, suppose we define a tank location called Pipe used to represent the connection between Tank1 and Tank2. Whenever transferring from Tank1 to Tank2, you would enter the following:
Tank_SetLevel (Pipe,1)
Tank_Transfer (Tank1, Tank2, ….)
Tank_SetLevel (Pipe, 0)
For systems that process entities at rates higher than one hundred units per minute, using discrete entities could make the simulation extremely slow. For this reason,
The operation logic for the container at the arriving location would be as follows:
WAIT 1 min
Tank_Inc (FillerInput, 200)
To model the processing of bottles from FillerInput to FillerOutput, enter the following statement in the model initialization logic.
ACTIVATE Tank_Transfer(FillerInput, FillerOutput, 999999, 110, 0, 1500)
This statement causes the FillerInput tank to transfer bottles to FillerOutput at a rate of 110 per minute whenever there are bottles in FillerInput and capacity available in FillerOutput. The resume level is 1500. (Up to 999999 bottles will transfer.)
To model the creation of a 50-bottle box each time the filling station fills 50 bottles, define and activate the following subroutine in the model initialization logic:
Tank Loop //causes logic to repeat continuously
{
Tank_Dec(FillerOutput, 50)
Order 1 Box to Shipping
}
Please Note: The Tank_Dec statement automatically removes 50 bottles from FillerOutput whenever there are at least 50 bottles available.

|
© 2012 ProModel Corporation • 556 East Technology Avenue • Orem, UT 84097 • Support: 888-776-6633 • www.promodel.com |